If a page is not indexed, it remains invisible and fails to reach the right audience. Indexed pages are important for a website to improve its organic traffic. Google is one of the major search engines where businesses can stay dominant by reaching their target audience.
Google Indexing enhances site performance and may even give a major boost to conversions by sending the website on page one. In this blog, let’s understand what Google New API Plugin is and how it benefits in instant indexing.
Common Reasons Why a Site Fails in Indexing
Google’s indexing process involves several steps. A simple error can make the complete process go in vain. So, it is necessary to validate if there are any issues, and if found, need to fix them at the earliest.
Below are some of the reasons why webpages fail to get indexed.
- Site Is Not Mobile-Friendly
- Issues with Loading
- Usage of JavaScript for rendering content
- Failure in adding all domain properties to Google Search Console
- No-Index
- Not Using a Sitemap
- Improper URL structure
- Use of Robots-No-Index tag
- Redirect Errors
- Submitted URLS are Soft 404
- Duplicate/Low-Quality Content
- Missing Interlinks
- DNS Issues
In addition to these, there may be other reasons too impacting page indexing. Google receives a number of indexing requests regularly. It takes a minimum of 3 days to index a webpage.
However, indexing has now become easier with the new Google Indexing API plugin. With this plugin, we can easily identify the crawling errors and get pages indexed instantly. It gives a great advantage to the marketers of this era to stay ahead in the search results with quality organic traffic.
What is Google Indexing API Plugin?
With Google’s new Indexing API Plugin, any site owner can directly inform Google when a new page is created. When placing an indexing request through this plugin, one can easily find the errors and resolve them instantly. The plugin is explicitly helping webpages to get indexed instantly and rank faster.
Steps to follow for indexing a page or site with Google Indexing API Plugin
Google Application Programming Interfaces (APIs) help in communicating with Google services and other integrated services. Google’s Indexing API is specifically designed to inform Googlebot to crawl pages faster.
Here is the step-by-step guide for using the new Google Indexing API Plugin.
Step 1 : Follow the steps below for creating an indexing API project
- Login to your Google Cloud Platform account. Create one, if you do not have an account
- Click on the Select a Project. From its drop-down, choose the New Project option
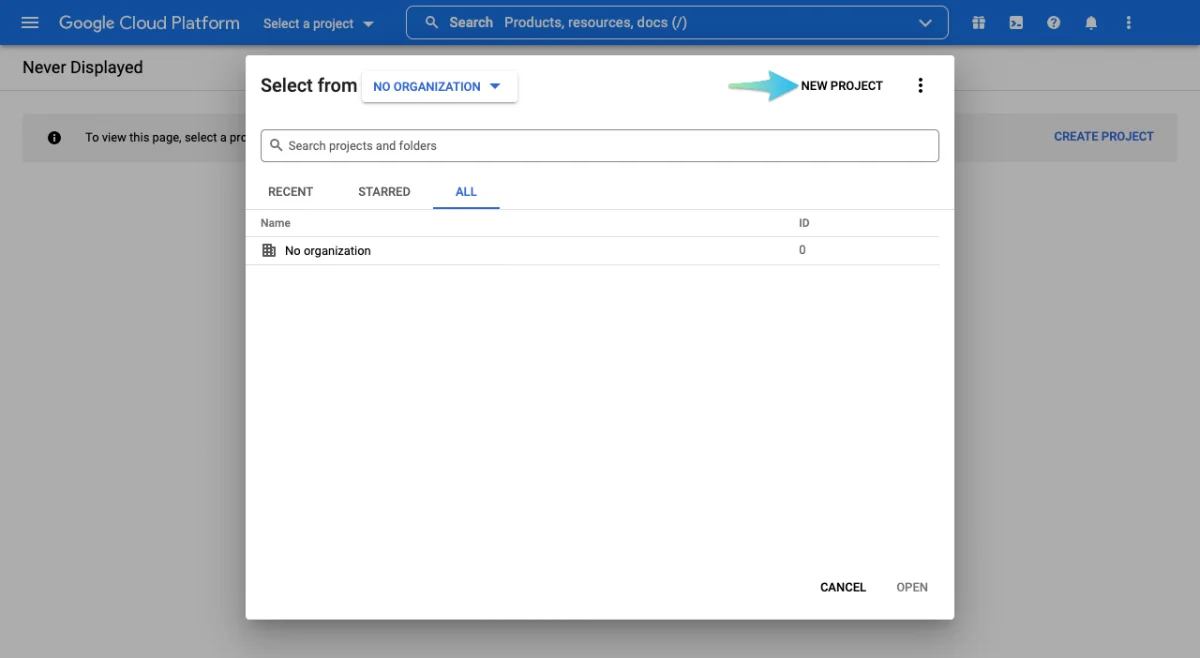
- Click on the Create Project option for creating a new indexing API project

- Enter a project name and click Create. Ensure to use a name that can be recognized later
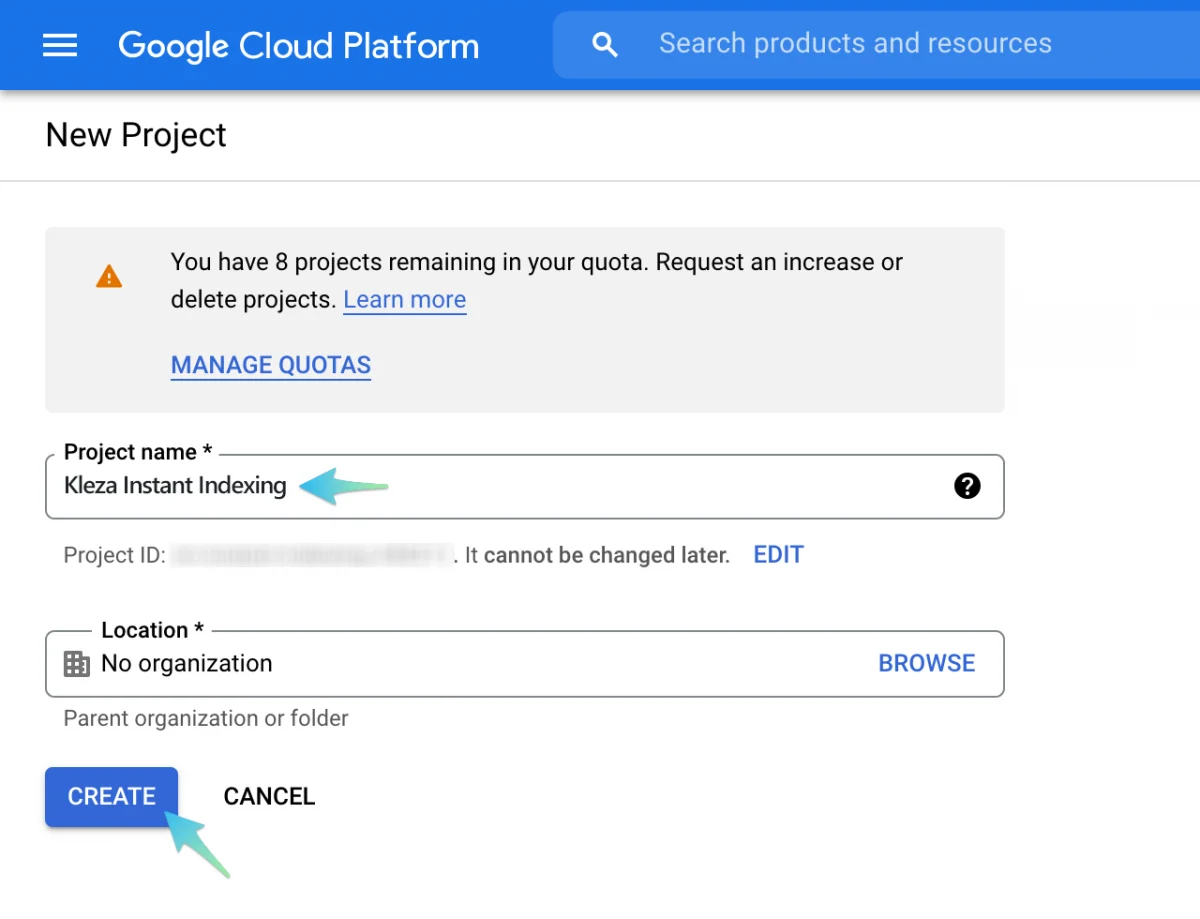
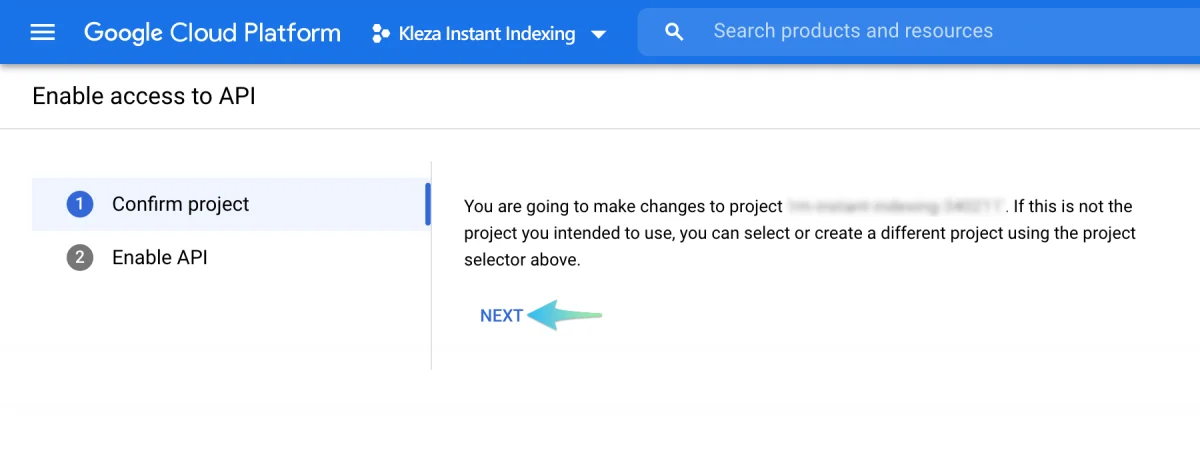
- Once the project is created, you need to Enable API access. Select the project which requires Instant Indexing API and click on Next
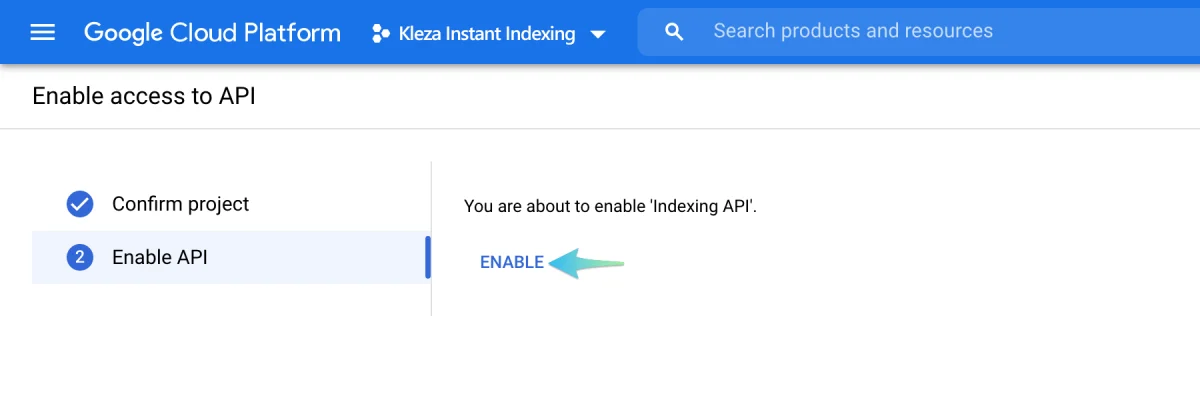
- Click on the Enable option and close it. This step enables the project to access the Instant Indexing API.
Step 2 : Follow the steps below to create a Service Account
- Open the Service Accounts page to create a service account
- Now, you will be asked to select the API project for which you are planning to create a Service Account
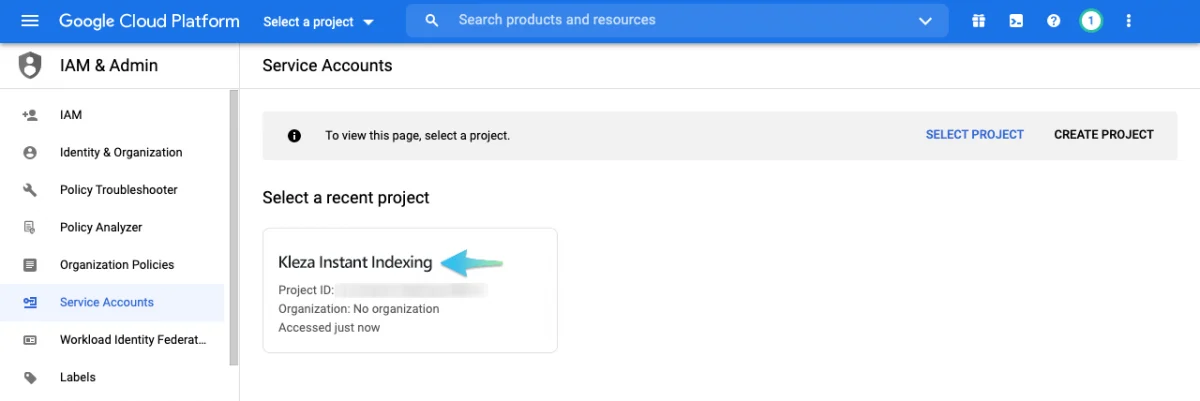
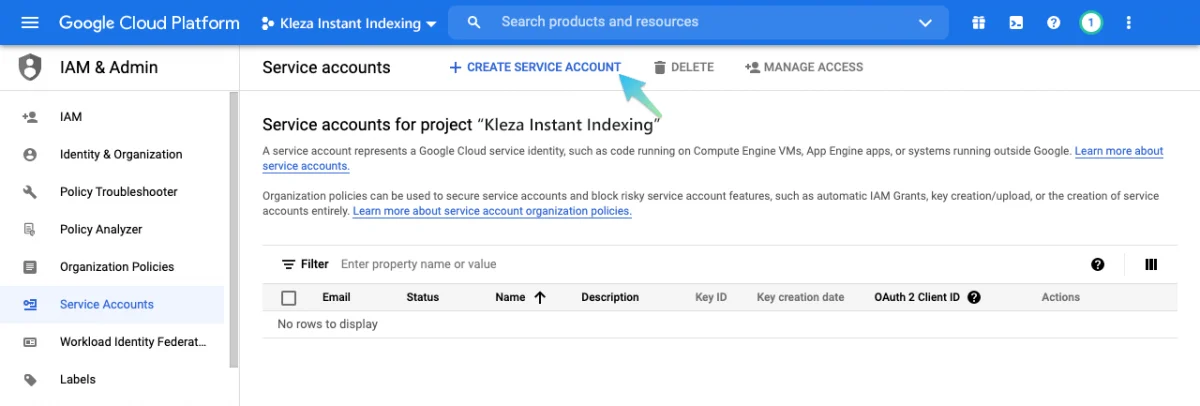
- Once the project is selected, you will be taken to another page to create an account. Click on the Create Service Account button. Then enter a name or description for the newly created Service Account
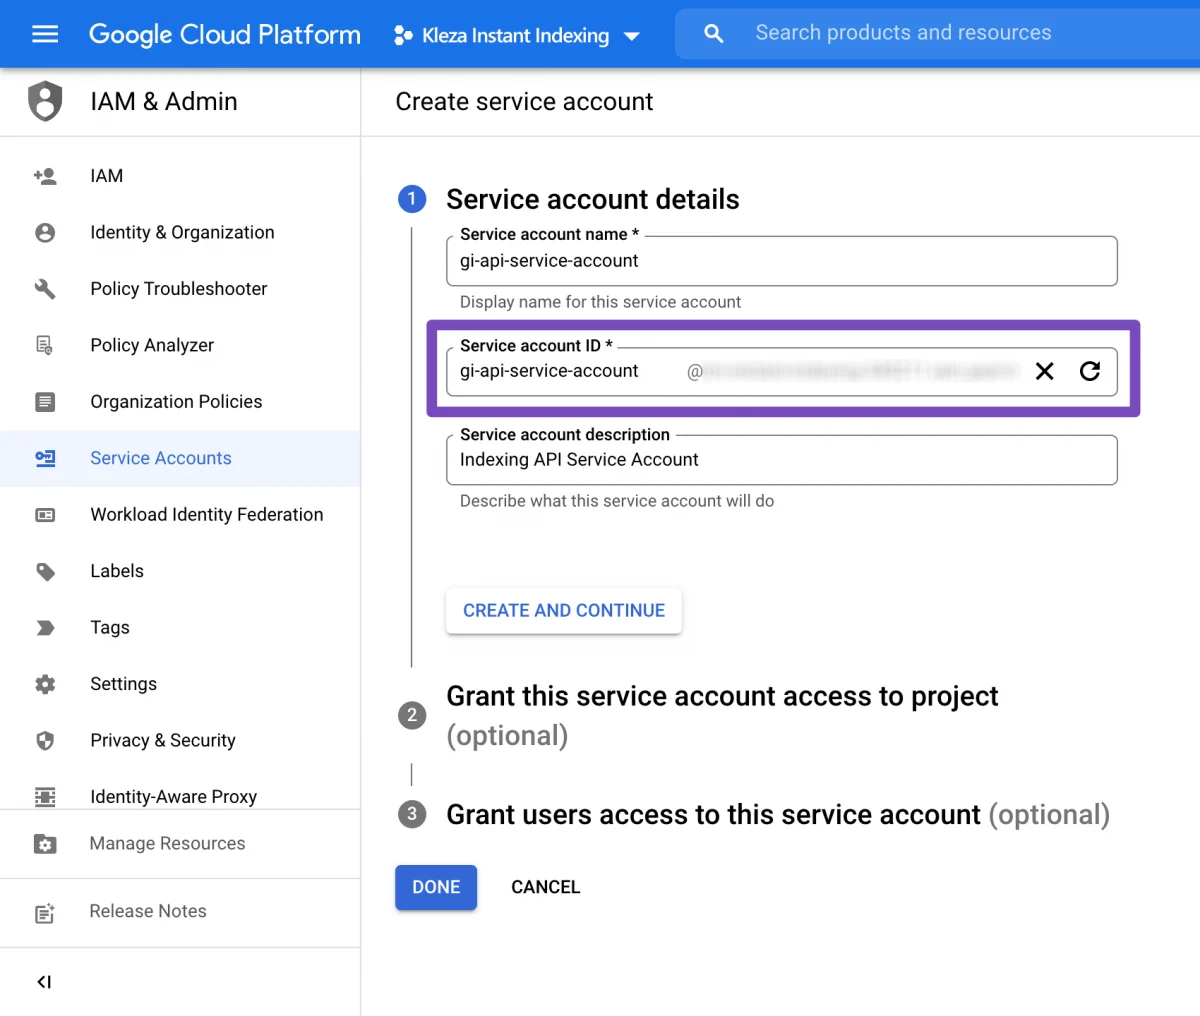
- While entering the details, make sure to copy the Service Account ID which looks similar to an email address. Then, click on the Done button
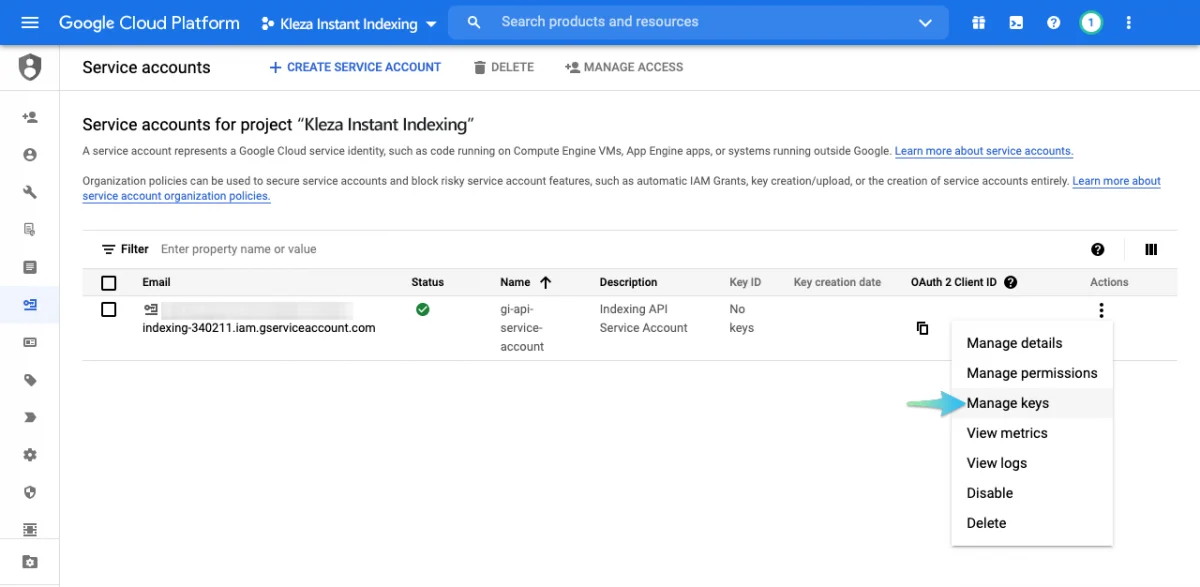
- Click on the three vertical dots which are under the Actions column. Then, click on Manage Keys
- Your next step is creating a new JSON key for the service account. You need to click on the Add Key, and from its drop-down choose Create new key option
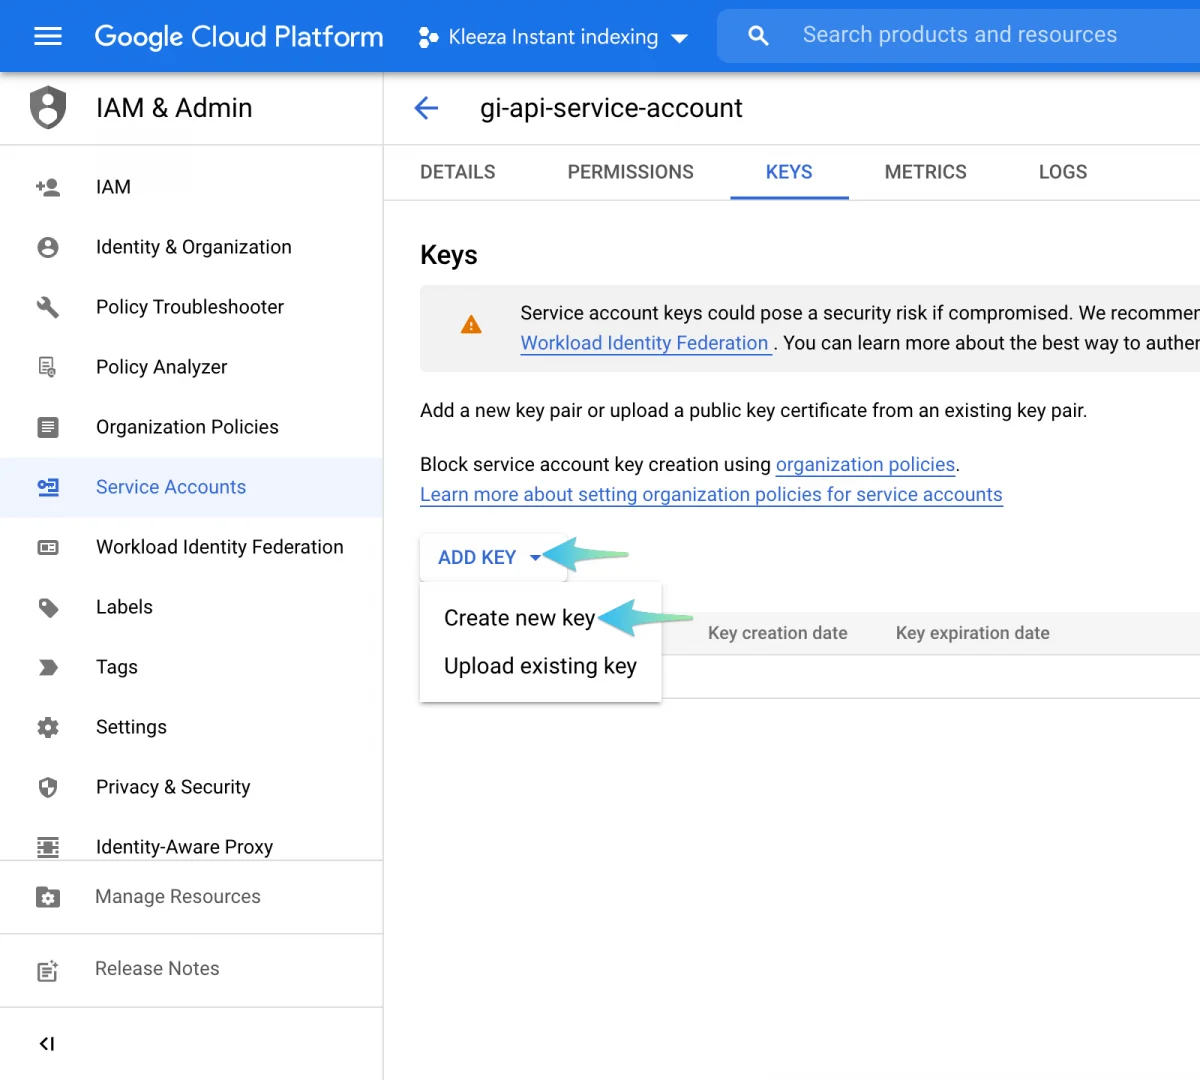
- A dialog box will appear to validate which type of key format is needed. Choose the JSON Format and click on Create
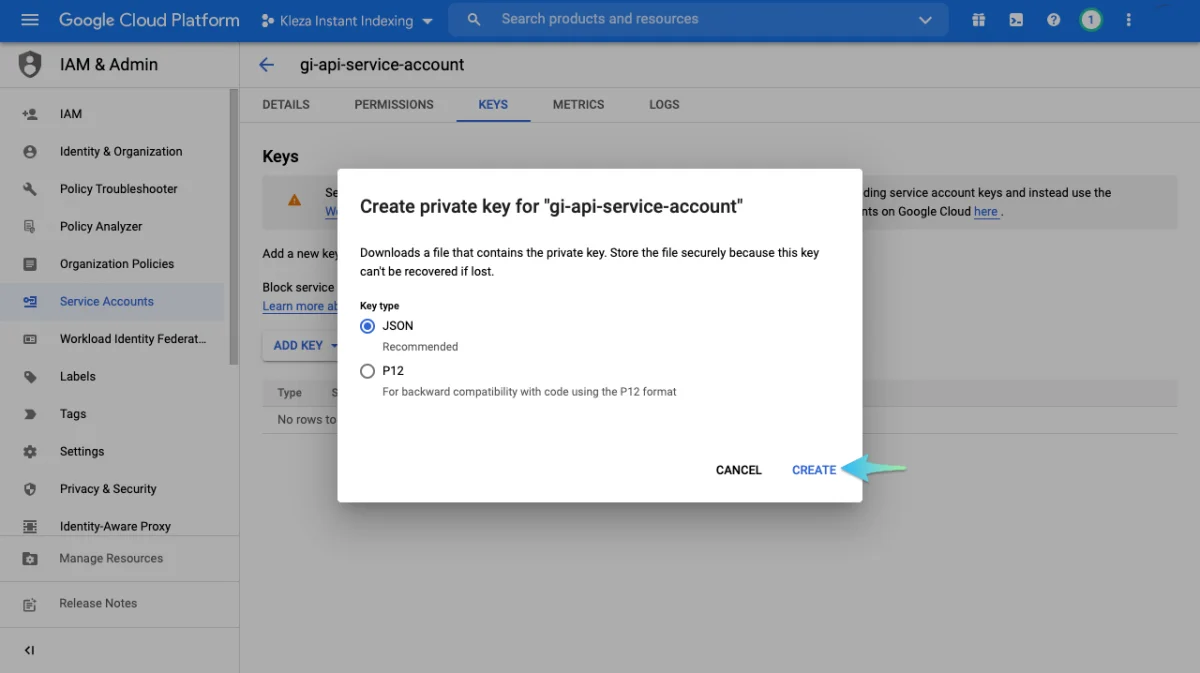
- The .json file will be downloaded automatically. This step is confirmation that you have created the API key successfully
Step 3 : Add the service account as an Owner for the Google Search Console
- Register and verify your website with the Google Search Console Google Search Console
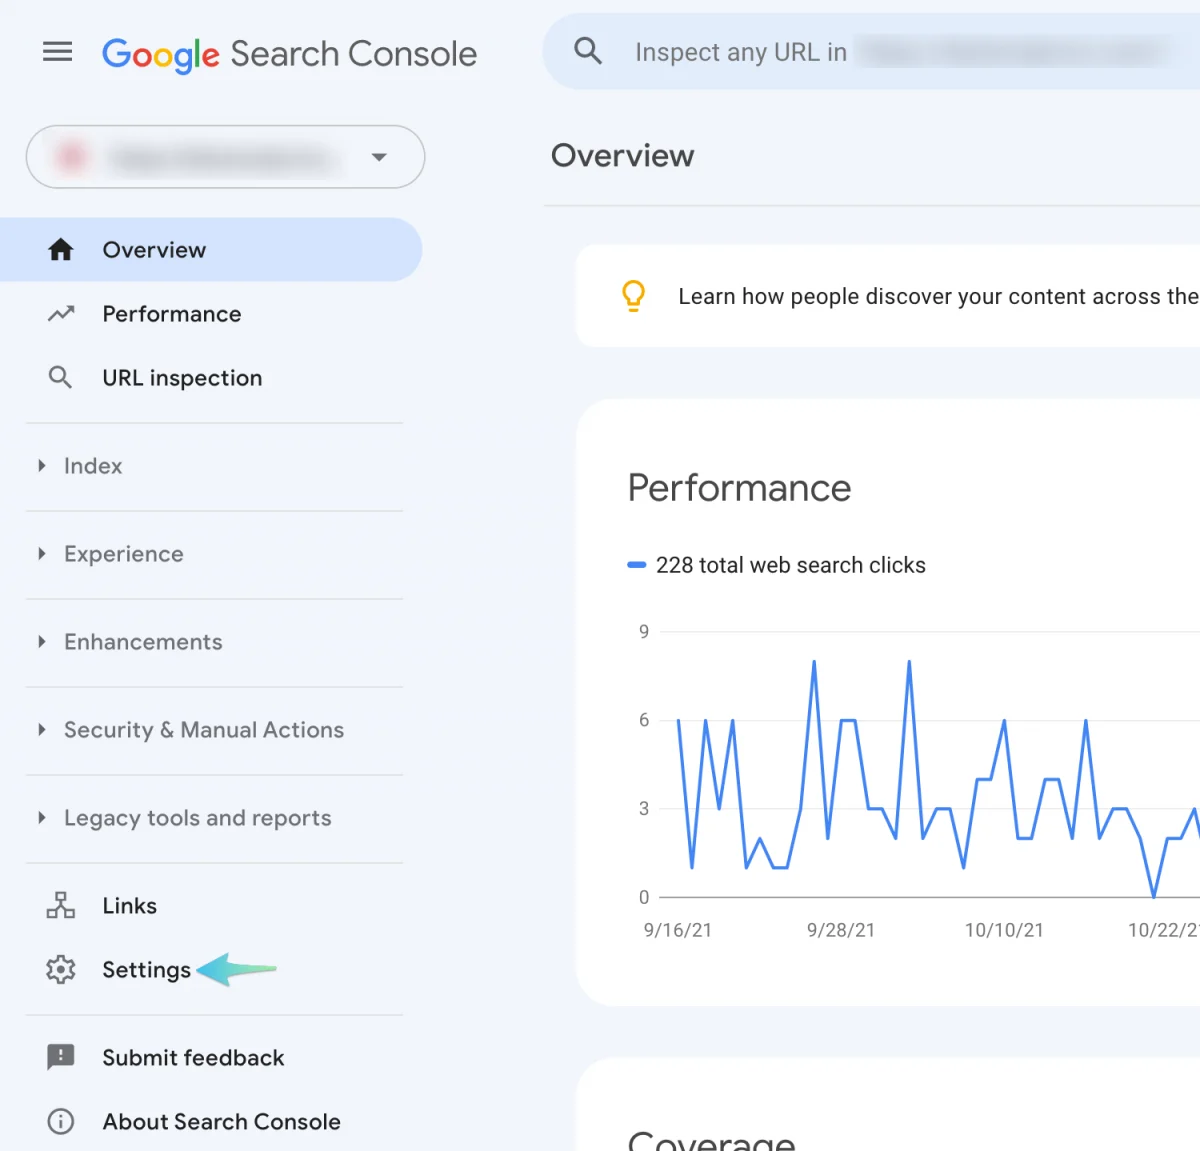
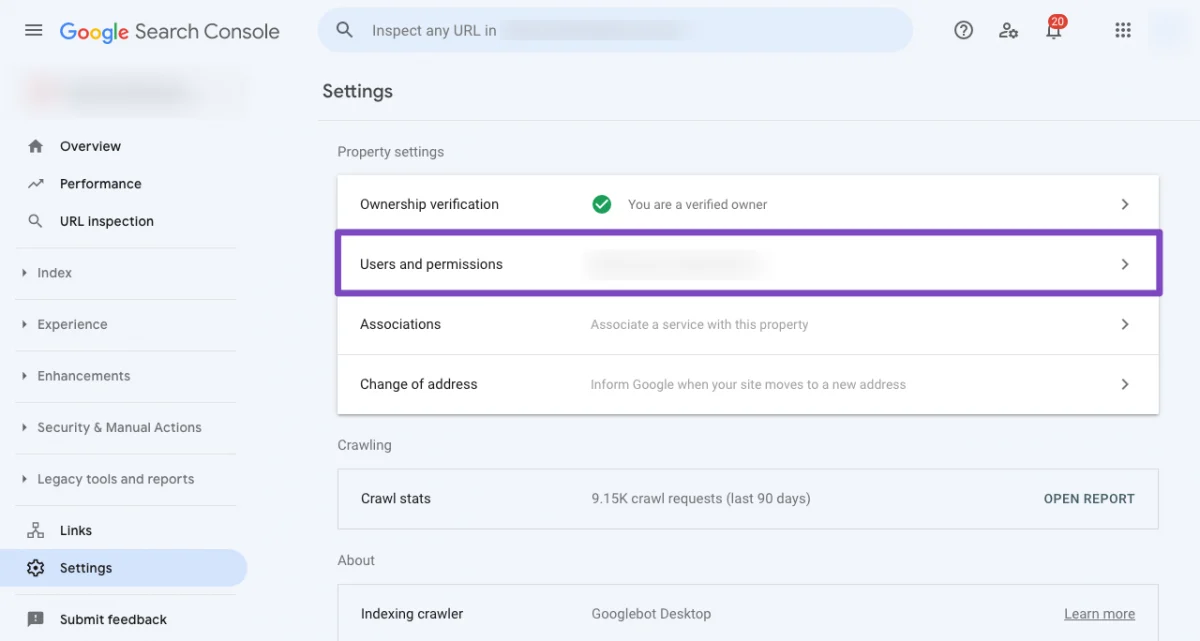
- To validate the ownership property, open the Google Search Console, select the property and click on Settings
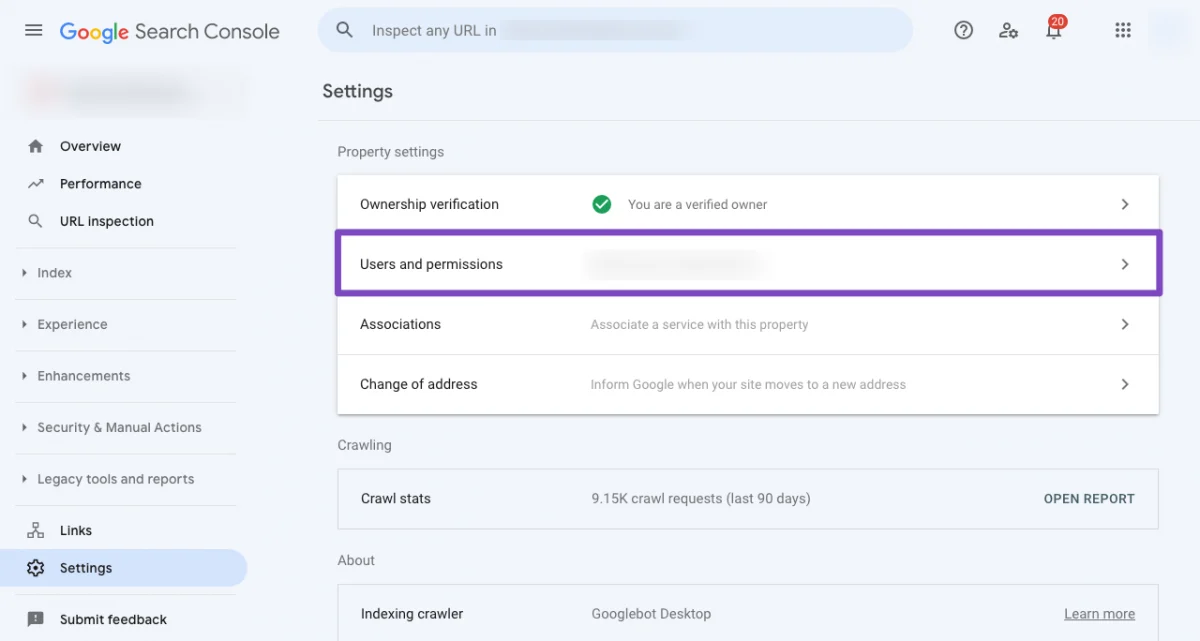
- Click on Users and permissions
- You need to click on the three dots which are next to your account to add a user. Click on Add User
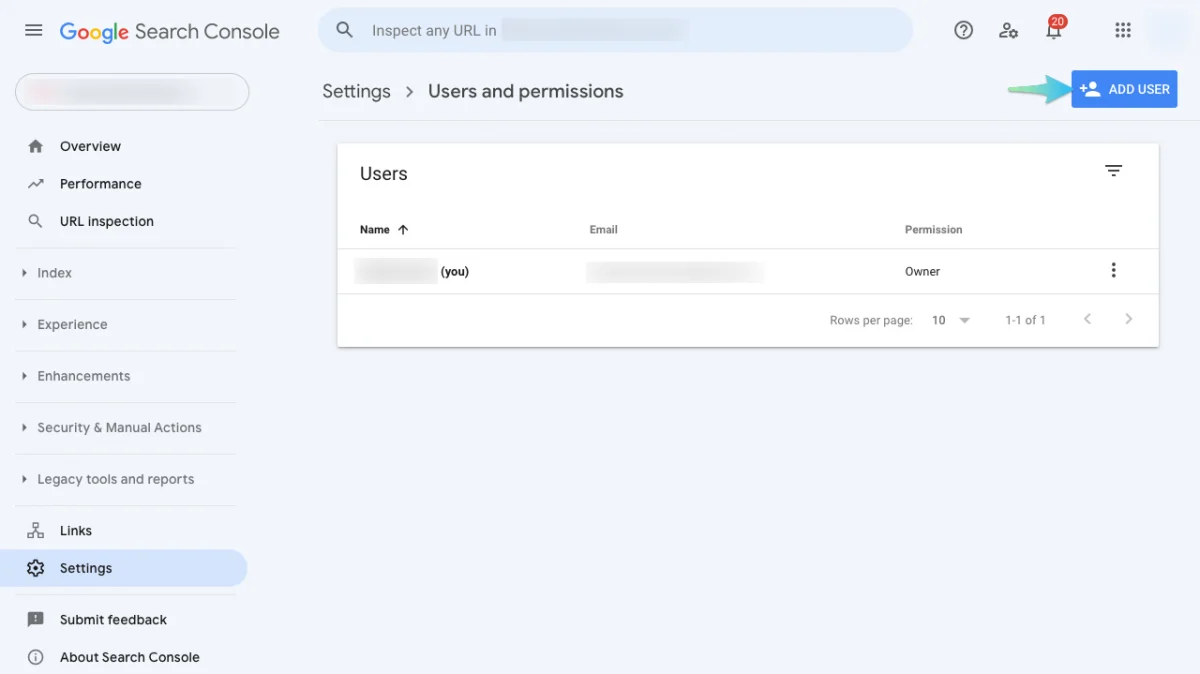
- A pop-up will appear asking for details. You need to enter the Service Account ID (which was saved before) in the Email Address section. Make sure you have given the Owner level permission and click on Add
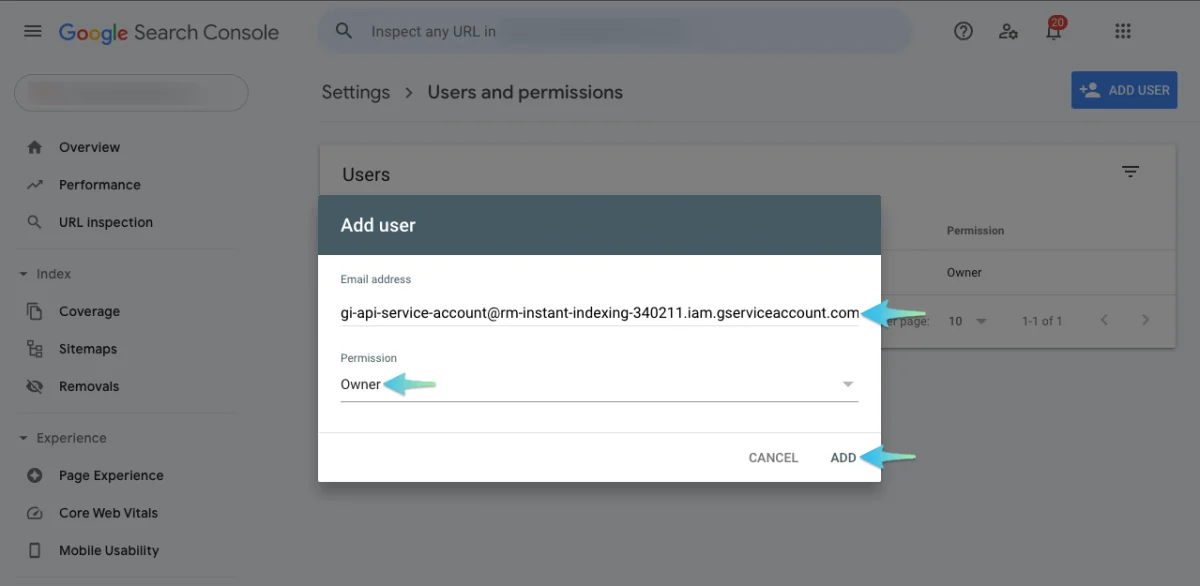
- Next, you have to check whether the provided Service Account has received the ownership or not
Step 4 : Download the Google Indexing API Plugin
Step 5 : Plugin Configuration
- Upload and install the Instant Indexing for Google plugin from WordPress Dashboard
- Alternatively, you can also install the Plugin through the WP Admin Panel

- Activate it and navigate to Rank Math → Instant Indexing Settings. Under the Google API Settings tab, copy and paste the contents available on your JSON file or upload the file
- Now, select the type of posts you want the Indexing API to remind Google for crawling as soon as it is published /updated or deleted. Then, click on Save Changes
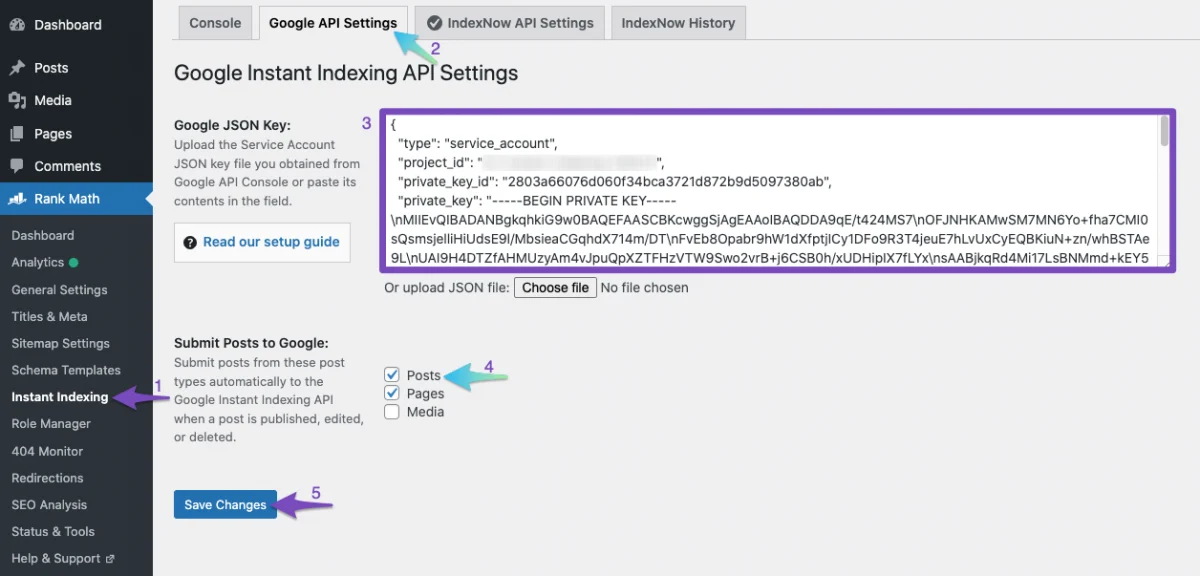
- You can now use Google’s Indexing API to have any page or post indexed instantly on your website
- Go to the Console tab and enter a URL or more under the Instant Indexing Section. Choose the Action as Publish/update URL and click on the Send to API button
- You will see a response instantly from API similar to the below
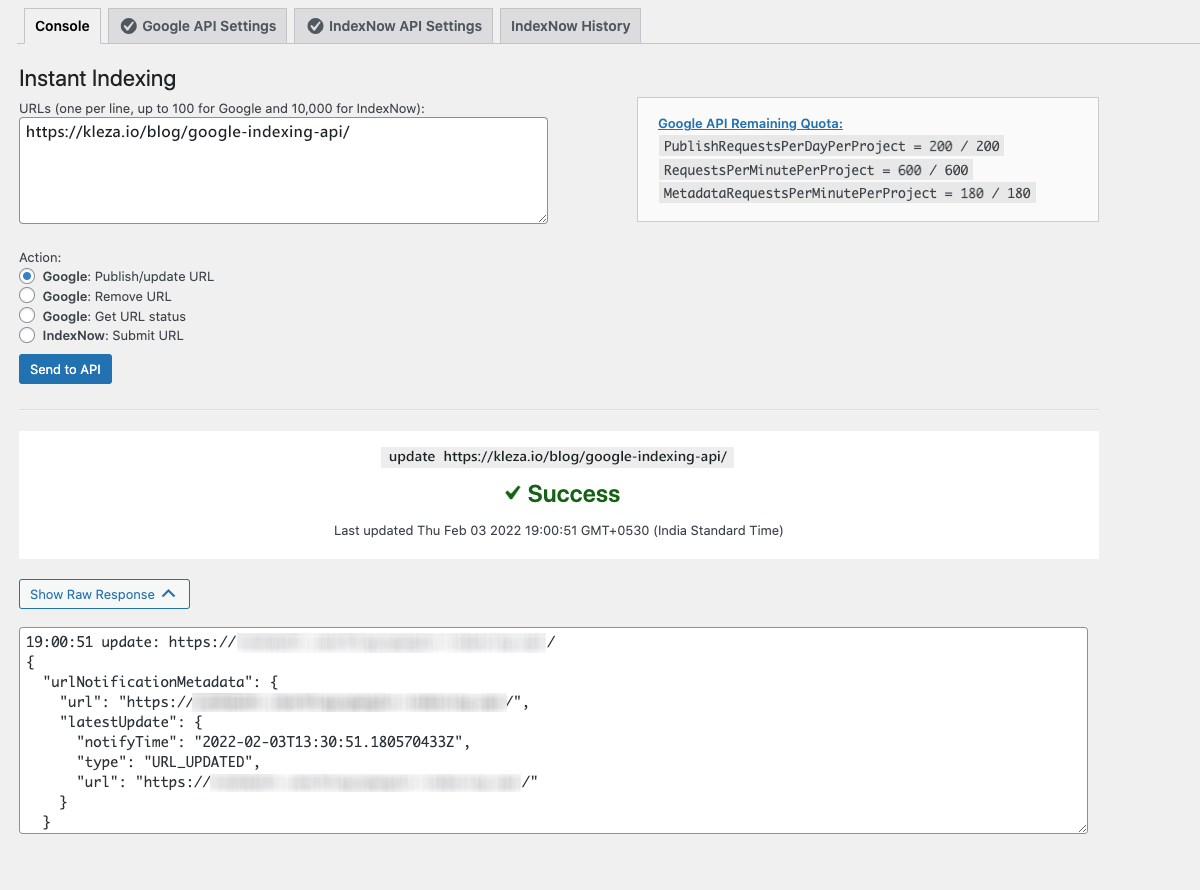
- You can check the status of the URL by selecting Get URL Status and remove the URL by choosing Remove URL
- Instead of entering the URLs in the Instant Indexing section, you can also index the pages from WordPress posts section.
- When hovering on each post, there will be an option to update/check the status of a post. You can select a post or page individually or make use of the bulk options to index or update posts instantly
- Follow these simple steps to get pages indexed instantly with Google’s Indexing API
Looking for more details? Do reach us to get support from our expert team!

